How Is Flashig Attached Behind Siding

Deck Ledger Board Installation Google Search Removing Vinyl Siding Vinyl Siding Vinyl Siding Cost
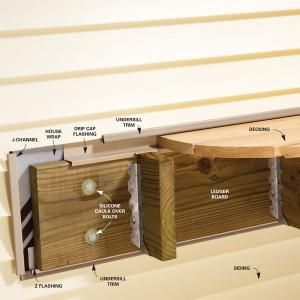
Pin On Repair Vinyl Siding And Gutters

Siding Transitions Vertical Siding Vertical Siding Exterior House Cladding

Tips On Removing Vinyl Siding For Attaching Ledger Board Building A Deck Under Deck Ceiling Deck Installation

Pin By Jake Demeer On Porch Building A Deck Timber Deck Deck Framing

Pin On Backyard

Keep water out of your home and running down the roof where it belongs with appropriate use of step flashing.
How is flashig attached behind siding. Pry the siding out near a nail then push the pry bar against the nail as you partially tap the siding back in. How to install step flashing under siding. The vertical flange of the flashing is to extend up behind the adjoining siding. Slip the back flashing under the siding at least 3 at the top and the sides.
This results in a 2 inch minimum head lap. Begin at either end of the wall and set the level middle section of the z flashing onto the top edge of the siding panel with the wider flange upward and against the wall framing. That should pop the nail head out far enough so you can pry it out. The type and location of the flashings will vary depending on the type of windows and doors.
For a wood window unit drip cap flashing can be installed over the trim piece often called brick molding that comes. Install the first length of z flashing. Start by making an outline on the siding where you want to position the ledger board. If you have vinyl or metal flanged windows for instance you can install drip cap flashing 4 the home depot over the window itself or over the top trim piece that you install.
Flush the end of the flashing length with the wall corner and secure the flashing to the framing with an 8d nail at each wall. Then slip flashing behind the siding covering the top edge of the ledger. Step flashing is used where a roof meets a. The recommended width of step flashings will vary depending on the agency entity being referenced.
Make the outline large enough to include space for the deck boards on top the ledger and any trim boards on the sides. You may need to pry out siding first. If the sidewall is stucco or solid wood like ours and you can t open it to get flashing behind it continue the step flashing to the peak of the roof then cover the step flashing with cap flashing.

Attaching A New Deck To A House The Correct Method Deck Building Plans Building A Deck Diy Deck

Pin On Info With Some How To S

Deck Ledgers Best Practices Manual Hammer Hand Pacific Nw Builder Diy Deck Building A Deck Deck Design

Attaching Pergolas To Vinyl Siding Google Search Building A Deck Deck With Pergola Diy Deck

Pin On Construction

Pin On Roof

Pin On Diy Repairs

Pin On Deck
Pin On Construction

Pin On Building Science

Pin On Front Porch Siding

13 Simple Vinyl Siding Installation Tips Vinyl Siding Installation Installing Siding Vinyl Siding

Pin On Roofing Design

Pin On Fyi For Rehabs

Vinyl Siding Fiber Cement Siding Cement Siding Vinyl Siding Fiber Cement Siding

Pin On Skylite

Pin On Metal Roofs

Pin On Decks
Https Encrypted Tbn0 Gstatic Com Images Q Tbn 3aand9gcsvqfesqklvzh63sunuyqluje F9j9lkaylpokowbuhowliffug Usqp Cau

This Illustration Shows The Correct Way To Detail The Transition Between Dissimilar Cladding Types A Flas Exterior Cladding Cladding Installing Exterior Door

Pin On New House Exterior

Pin On Patio

Pin On Outdoor Ideas

It S Ok We Ve Got The Tools To Fix This Aluminum Siding Black Decker Projects

Pin On House Construction

Pin On Decks

Pin On Excellent Exteriors

13 Simple Vinyl Siding Installation Tips Vinyl Siding Installation Installing Siding Vinyl Siding

Pin On Dj

Pin On Architecture Products

Siding Replacement Wars James Hardie Vs Lp Smartside In A Battle For Contractors Builders And You In 2020 Hardie Replacing Siding Siding

Window Head Trim And Drip Cap Fine Homebuilding Building A House Drip Edge Windows

Gable Soffit And Fascia Vinyl Siding Installation Installing Siding Diy Roofing

Attaching Trim Over Bug Screen On Roof Peak Bug Screen Metal Siding Siding Options

Pin On Deck Ledger Board

Replacing Metal Corner Caps On House With Wood Siding Siding Repair Masonite Siding Hardy Plank Siding

Pin On Decks

How To Build A Deck Attaching The Ledger Board Building A Deck Diy Deck Deck Building Plans

Cedar Siding General Installation Tips Real Cedar Cedar Siding Installing Siding Installing Cedar Siding

The Antisocial Network Decks For Dumbasses The Freelance Files Cclxxviii Building A Deck Decks And Porches Deck Building Plans

Materials For Board And Batten Siding Board And Batten Siding Board And Batten Exterior Exterior Siding

Vinyl Siding Tips Installing Siding Vinyl Siding Installation Vinyl Siding

